2011年6月29日星期三

How to create iPhone ringtone with Aiseesoft iPhone Ringtone Maker

You bought an iPhone and love all its features, but wish you didn't have to pay for your songs twice to get a ringtone. (We know that iPhone, iPhone 3G Ringtones use the file extension .M4R. And the users must pay $2 for a piece of song through Apple iTunes store). There are plenty of songs in your music library, but no way to make ringtones from any of them. Rihgt?

Actually, with a little bit of trickery (nothing illegal) you can create ringtones from any one of your non-DRM songs.

This works on both Mac and Windows PCs.

Window Users
You can create free iPhone Ringtones by yourself with Aiseesoft iPhone Ringtone Maker.

You can take the following step-by-step instructions to start.

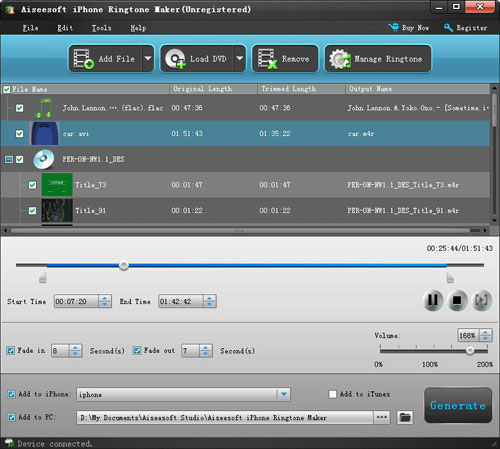
Step 0: Download and install Aiseesoft iPhone Ringtone Maker. After a short while, you can see the following interface:


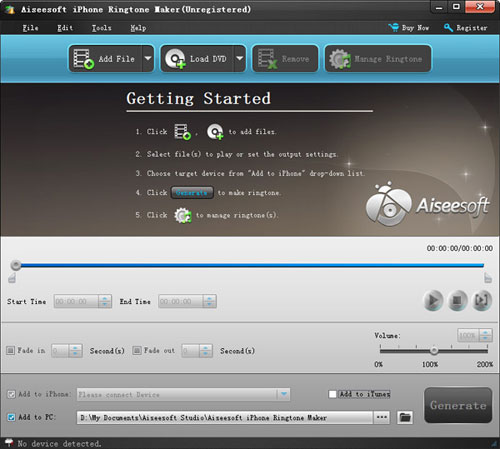
Step 1: Click “Browse” on the right side of "Input File" to import the file that you want to make ringtone from it.
Step 2: Play it and listen the music to find the segment that you want to use it as ringtone. Then drag and click the start & end slider to set your wanted segment, or type the start & end time in the corresponding text box directly to get the exact segment. You also can pre-listen the converted audio before generate.
Step 3: Click “Browse” on the right side of "Local Output Folder" to choose the output destination.
Step 4: Check "Export to iPhone" option, the converted ringtone will be load to your iPhone directly.
Step 5: After all the settings are finished, click “Generate” to begin making your own iPhone ringtone.

Key function
● Convert any video to iPhone ringtone M4R
● Create iPhone ringtone from any audio files
● Get any clips from video and audio
Edit Added iPhone ringtones
Using Aiseesoft iPhone Ringtone Maker, you are free to edit the added iPhone ringtone by removing it or renaming it directly.

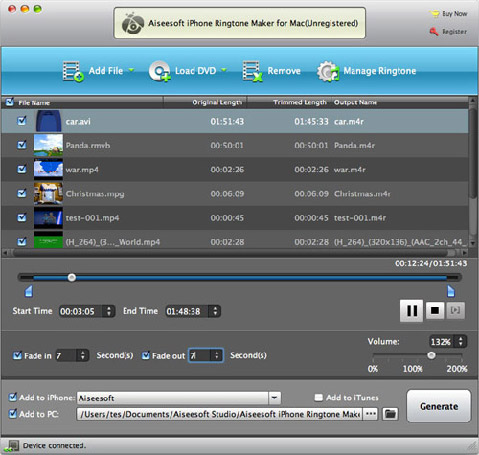
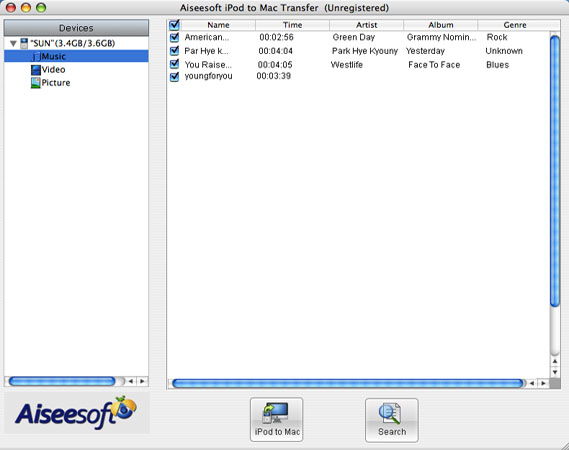
For Mac Userd, please go to Aiseesoft
iPhone Ringtone Maker for Mac

2011年6月28日星期二

How to Rip Blu-Ray DVD and Common DVD to iPad/iPhone/iPod

Blu-ray DVD is more and more popular among us since the images on Blu-ray disc are sharper, brighter, and more detailed than any DVD movie. What manufacturers are trying to do is to make the movie look as close to what you see in a real theater as possible.
It is a great choice to put Blu-ray DVD to iPad/iPhone/iPad. Aiseesoft Blu-Ray to iPad Ripper is the professional software that can rip Blu-ray DVD, common DVD and convert video to iPad/iPhone/iPod with good output quality, easily and fast.
How to Rip Blu-Ray DVD to iPad Format?

Tools you need:
1. Blu-Ray DVD Driver
2.Blu Ray to iPad Ripper
Preparation:
You need install and run this Blu-Ray to iPad Ripper


Step 1: Load your BD
Load your BD disc in to your Blu-ray driver.
Step 2: Output Profile
Choose your output profile from the drop-down list according to your need. You choose output format as your devices and also with specific video format.
You can also set the specific settings of your output video, such as “resolution” “video bitrates” “encoder” and so on.

After you have done all the tings above, you need to click the start button to convert your Blu-ray disc.

Tips:
You can also do many video editing works about your output video.

1. Effect:
You can adjust the “Brightness”, “Contrast”, “Saturation” of your output video and also you can select to use the “deinterlacing” function which make your video more enjoyable.
2. Trim
To pick up any part of your BD movie to converter, you can use “Trim” function.
3. Crop
You can choose any play area to convert by using the Crop function.
4. Watermark
You can add your own watermark on the output video, the watermark can be words and also picture. You can choose the font of your words and other really enjoyable function.

2011年6月26日星期日

Full Guide: How to Convert DVD to MP4, AVI, 3GP, iPod ......

DVD is the first choice for many people when they want to watch movies at home. It has high quality picture, different subtitles and audio tracks and most important, some of the DVD movies are more enjoyable than than the cinema one.
However, when we travel, when the disc is broken, when we want to backup the DVD movies, when we want to share the movies with friends, when we want to make usage of the movie, what should we do?
Convert DVD to video video formats you need.

This guide aims to show you how to convert DVD to different video format both for windows/mac users.

Part 1: How to Convert DVD on Windows with DVD Ripper


Step 1: Load DVD
Put your DVD to your DVD Drive and click “Load DVD” button to add your DVD
Step 2: Choose Profile
Choose your output video profile from a drop-down list.
Step 3: Start Conversion

Part 2: How to Convert DVD on Mac with DVD Ripper for Mac


Step 1: Load DVD
Click the “Load DVD” button, find the DVD folder of the movie you want to add from your DVD-ROM, and Click “Open”.
Step 2: Choose output profile and settings
Selecting output format is really easy, you can chose your output format according to your devices players and the default setting works great.
For a veteran of digital player, you could customize your own settings by clicking “Settings” button to chose your own video resolution, frame rate, bit rate, encoder, etc.
Step 3: Start Conversion

If you want to convert both DVD and videos, here is a really powerful DVD Converter Suite . It can help you to convert DVD and videos easily. It can also help you to backup the iPod music and videos to your computer.

2011年6月24日星期五

How to Rip DVD and Convert Video for Your iPad On Windows/Mac

Aiseesoft iPad Converter Suite is newly released software for iPad fans. It can rip any DVD files (DVD-Video, DVD folder and DVD IFO file) to iPad, convert all popular videos/audios to iPad formats and transfer files from PC to iPad, from iPad to PC and from iPad to iPad. It works similar to iTunes. So why do you always buy movies and songs from iTunes with extra money? It can help you make use of your resources.
The product is very easy in use. You just need download, install and run the trial version.


The product is multifunctional. It can trim, crop, edit video effect, merge, add text and image watermark, select audio track and subtitle, adjust video settings and snapshot.

If you are Mac user, you can choose Aiseesoft iPad Converter Suite for Mac .

2011年6月23日星期四

How to Make iPhone Ringtone From DVD Music/Music/Video?

People want to show their individuality anytime and anywhere with their inimitable hairstyle, clothing, and other things. Your phone's ringtone is also really important to show your difference from others. So how to make your own unique ringtone for your incoming calls, clock alarms, clock timer becomes a really important thing.

Today I will show you how to make your own iPhone ringtones from your DVD/video/music. Someone will say that you can buy them on itunes. Yes, everybody can buy it. It is not unique and special. Let's make our own iPhone ringtone together.

Things you need:
1. DVD/video/audio files that contains the music you want
2.iPhone Ringtone Maker
3. Computer(Windows/Mac)


Step 1: Load File/DVD
Load your video/audio files or DVD to this iPhone Ringtone Maker

Step 2: Choose music
You need to choose which part you want to convert as your iPhone ringtone or you want to make the whole files as your iPhone ringtone. Just drag the bar to set the begin point and end point

Step 3: Pre-listening
You can pre-listening the ringtone, if you do not like it you can adjust the length of your ringtone.

Step 4: Make Ringtone
After you have done all the tings above, you can click “Generate” button to start the conversion.
Soon you will get your own ringtone.

Tips:
1. if you want to put your ringtone directly to your iPhone, please check the box before “import to iPhone”.

2. if you want to manage your ringtone, you can click “manage ringtone” button to do it easily.

For Mac users, you can use
iPhone Ringtone Maker for Mac to do this easily with the same operation as windows one.


To help you to make your iPhone and iPod more enjoyable here I also recommend you this
DVD to iPhone Converter

2011年6月22日星期三

How to Copy DVD, Rip DVD, Convert Video on Mac

Many friends want to share their home-make DVDs and their DVD movies with others and also they always feel difficult to do that. Today I will share you a really easy way to Copy DVD to another DVD disc, DVD image ISO, or a DVD folder. Also I will also introduce you how to rip DVD and convert videos on Mac.

Part 1: How to copy a DVD to another DVD disc/DVD image ISO/DVD folder on Mac
Step 1: DVD Copy for Mac.
To copy a DVD on Mac, you need a DVD Copy for Mac to help you. Aiseesoft DVD Copy for Mac is a good choice.


Step 2: Load Your Source
This excellent DVD copy for Mac allows you to load DVD folder and DVD image ISO.

Step 3: Choose Output Info
1. “Full Disc” or “Main Movie”
This DVD copy for Mac enables you to copy the full disc and also the main movie according to your need.

2. “Audio”, “Subtitle” and “Volume” name
You can choose your output audio from the “Audio” drop-down list, such as “all audio”/ “None”/ or some audio the DVD provide.

Subtitle is always an important thing, you can choose your output subtitle in “Subtitle” drop-down list.

You can also name your output volume's name

Step 4: Choose Your Target
You can copy your DVD to another DVD disc, DVD folder or DVD image ISO.

Tips:
1. You can also choose to copy the menus or not.
2. All the info you choose will be dispalyed on the “Info Box”.

Part 2: How to rip DVD to video formats on Mac

Step 1: Download Aiseesoft DVD Ripper for Mac

Step 2. Load DVD
Insert DVD into your DVD-ROM, run DVD Ripper for Mac, click “Load DVD”, find the DVD folder of the movie you want to add from your DVD-ROM, and Click “Open”.


Step 3. Set output format.
This best DVD ripper for Mac provides you output formats as many as you want. Just choose one from the drop down list “profile” according to your portable player.

Step 4: Conversion
You can just Click “Start” to begin your conversion.

Part 3: How to Convert Video files on Mac

Step 1: Download Aiseesoft Video Converter for Mac


Step 2: Load video
Easily click “Add File” to load your video that you want to convert.

Step 3: Choose output profile and settings
At the bottom of the interface there are a drop-download list named “profile”. You can choose your output format here.

Tips:
1. Trim
If you want to pick up a part of the video to convert, please click “Trim” button and drag the “Start trim slider” to set the start time and “End trim slider” to set the end time. (a) You can also do that by clicking the “Start trim button” and “End trim button” (b). The third way you do that is set the exact Start/End time at the right of the pop-up window and click “OK”.(c)

2. Crop
If you want to remove the black edges or you want to convert a certain area of your video, please click the “Crop” button. You can do this either by drag the frame around the movie (a) or set the crop value: “Top, Left, Bottom, Right”.(b). Another way to do that is choose models from “Crop Mode”(c).
Aiseesoft Video Converter for Mac also allows you to chose the output aspect ratio above the crop pane, “Keep Original, full screen, 16:9 and 4:3” are available.

3. Effect
If you want to adjust the effect of your movie, please click the “Effect” button and a pop-up effect window will appear. It allows you to edit your movie’s effect including “Brightness, Contrast, Hue, Saturation and Volume”.

2011年6月21日星期二

Helping Users Enjoy DVD Video on iPad 2

With the diversity of video formats, converting DVD to other formats has become an essential requirement of most multimedia users. Plus, since iPad 2 only supports MPEG-4, H.264/MPEG-4 AVC, MOV, M4V video formats and AAC, MP3, WAV, AIFF, M4A audio formats, it is impossible for iPad 2 users to play DVD movies on iPad 2. Now, the newly-updated best DVD Ripper for Mac will be their best choice to solve the problem.

Aiseesoft DVD Ripper for Mac is powerful software and very easy to use, which can rip DVD to popular video or audio such as MPEG-4, H.264/MPEG-4 AVC, MOV, M4V and AAC, MP3, WAV, AIFF, M4A to satisfy iPad 2. This best DVD Ripper for Mac also provides a wealth of conversion programs for the iPod, iPhone, PSP, Zune, Apple TV and other digital devices, so that you can easily convert DVD to formats which these devices support.

The best DVD Ripper for Mac provides video editing functions which make your conversion more flexible. With this best DVD Ripper for Mac, you can clip video segments, crop video size, edit video effects and add watermarks.

This Aiseesoft DVD Ripper for Mac deserves to be the best DVD Ripper software for Mac users:

1.

DVD video conversion


Rip DVD to AVI, MPEG, MPG, WMV, DivX, XviD, RM, MOV, FLV, 3GP, 3GP2, MP4, HD MP4, TS video formats.


2.

DVD audio extraction


The best DVD Ripper for Mac can extract DVD audio and convert it into various audio formats such as MP3, WAV, WMA, AAC, AC3, AAC, AIFF, AMR, AU, FLAC, MP2, OGG audio formats.


3.

Capture video image


With this best DVD Ripper for Mac, you can use any DVD video clips in a fixed time to crawl down the screen.


4.

Edit video effects


This DVD Ripper for Mac provides a powerful video editing function which allows you to crop video, adjust video subtitle, edit video effects, add video watermark.


5.

Merge files into one


This Mac DVD ripper allows you to put two or more files you choose into one output file.


Overall, the best DVD Ripper can meet the needs of you, so that you can get a perfect experience.
For more information about this magic software, please visit below webpage

2011年6月20日星期一

How to convert DVD to iPod/iPhone/Sansa/PSP/Zune/iRiver/Google Phone/Cell Phone, etc. on Mac

Many people like enjoy movies at home and they have piles of DVDs. So do I. I like watch lastest movie on my new Mac and it is wonderful. However, I always break and lose my DVDs and I was really sad because they cost most of my money. Luckily, I find a way to store my DVD movies on my new Mac computer and evern put it on my iPod because I use a DVD Ripper for Mac and it can rip DVDs to so many video formats, such as AVI, MP4, MOV, MKV, WMV, DivX, XviD, MPEG-1/2, 3GP, 3G2, VOB and so on.

To do this you must have a nice dvd ripper for Mac. So I find Aiseesoft DVD Ripper for Mac

OK, let’s do it.
Step 1. Download and install Aisesoft DVD Ripper for Mac.

For Intel

For Power PC

Step 2. Load you DVD.
Click the “Load DVD” button(a), find the DVD folder of the movie you want to add from your DVD-ROM, and Click “Open”.


Tick the check boxes(b) before the titles and chapters that you want to rip.

Step 3. Chose output profile and settings.
Selecting output format is really easy, you can chose your output format according to your devices players and the default setting works great.

For a veteran of digital player, you could customize your own settings by clicking “Settings” button to chose your own video resolution, frame rate, bit rate, encoder, etc.

Tips: Sample rate (Hz) = any value up to 48000 (higher value = better sound quality = bigger file)
Bitrate (kbps) = any value up to 160 (higher value = better sound quality = bigger file)


After setting your own output and settings you can click “Start” button to start your conversion. (The time of the conversion depends on your DVD and the settings you chose.)

Do a few more clicks to make your movie more enjoyable.
1. Trim


If you want to rip only a part of the DVD movie, please click “Trim” button and drag the “Start trim slider” to set the start time and “End trim slider” to set the end time.(a). You can also do that by clicking the “Start trim button” and “End trim button”(b). The third way you do that is set the exact Start/End time at the right of the pop-up window and click “OK”.

2. Crop
If you want to remove the black edges or you want to rip a certain area of your video, please click the “Crop” button. You can do this either by drag the frame around the movie (a) or set the crop value: “Top, Left, Bottom, Right”.(b). Another way to do that is choose mode from “Crop Mode”(c).
Aiseesoft DVD Ripper for Mac also allows you to choose the output aspect ratio above the crop pane, “Keep Original, full screen, 16:9 and 4:3” are available.

3. Effect
If you want to adjust the effect of your movie, please click the “Effect” button and a pop-up effect window will appear. It allows you to edit your movie’s effect including “Brightness, Contrast, Hue, Saturation and Volume”.

4. Merge into one file/audio track/subtitles
If you would like to put several titles and chapters into one output file, please tick the check box of the “Merge into one file”.
You can choose audio track and subtitles you like according to what you prefer and the DVD supports.

Follow what I said above I hope you could enjoy your DVD movies on your Mac and also on your iPod and other portable players

2011年6月16日星期四

Best Way to Share Your iPod/iPhone Files

iPod/iPhone have become an irreplaceable assistant of our daily life. While I have to say, compared to other portable device, iPod/iPhone also have some inconvenience, such as
Can't directly backup your video/ audio files to computer to avoid your files lost;
Can't share music and videos with your friends and family at will;
Have to use iTunes to add music and videos into your iPod/iPhone. Etc

So, here I will share some several useful tools to solve all your problems in this article.

Part one: solve the three problems with one tool-- Aiseesoft iPod Transfer
This Powerful iPod transfer can help you to backup files from iPod to PC , transfer files from one iPod to another one directly, and import video, audio files or folders from PC to iPod without iTunes,. And it supports all model of iPod and provides lifetime upgrade for free.
Free download it and have a try, it is totally clean- no adware/spyware/virus.


First usage: Import video and audio files or folders from Computer to iPod without iTunes
Step 1: Run the software, and connect your iPod/iPhone to your computer via USB cable.
Step 2: Click "Button 1" to seek the files or folders that you want to import to iPod and click OK.The process of importing will be finished instantly.

Second usage: Backup your iPod/iPhone files to your computer.
Step 1: Run the software, and connect your iPod/iPhone to your computer via USB cable.
Step 2: Open the library/playlist that you want to export files, and then check the file(s) you want to export in the file list.
Step 3: Click "Button 2" to select the destination of the exporting files and start exporting files.

Third usage: Transfer files from one iPod to another iPod
Step 1: Run the software, and connect two iPod/iPhone to your computer via USB cable.
Step 2: Open the library/playlist that you want to export files. Pick the files that you need to transfer.
Step 3: Click "Button 3", it will show you the folder of another iPod that you want to transfer to. Click OK. The transfer can be finished automatically.
If you are mac user, you can visit Aiseesoft iPod Manager for Mac

Part Two: Just need backup video/ audio files to computer to avoid your files lost
You can have a look Aiseesoft iPod to Computer Transfer


It can backup iPod video/audio files to computer, you don’t need to worry about losing
anything.
Step 1: Connect your iPod to your computer
Step 2: Choose files
Choose the songs, videos and other things that you want to backup at the top of the window
Step 3: Start to transfer
The most important and the last thing you need to do are to click the “export to pc” button .After
you click “export to pc” button a pop-up window will appear and with it you can choose where
you place your iPod songs and videos. Few seconds later you will have your iPod songs, videos
and other things on your computer.
If you are mac user, you can visit Aiseesoft iPod to Mac Transfer

Part Three: If you are iPhone user, share two similar tools for you: Aiseesoft iPhone Transfer, which can import video and audio files on PC to iPhone directly without iTunes. Backup files from iPhone to local disk without loss. Transfer files between two different iPhone.
and Aiseesoft iPhone to Computer Transfer.

2011年6月15日星期三

How to Rip DVD(windows/mac), Copy DVD, Convert Video?

Every year, my family will have a big party and all the members will get together. We have a very nice time on each year's party. And from the year 2000, I record the party and share with my family. I enjoy the work very much, while when I share the video or the DVD, it is really a big problem. But now I can solve it with only a few clicks.

So I write this article to show you guys how to deal with dvd and video stuff.

Part 1: How to Rip DVD on Windows and Mac

First Let me explain what is rip DVD. When I talk about “Rip DVD”, it means I will convert DVD video/movie to video format and you can play the video/movie without the disc. Of course, the original DVD will not be hurt.

For Windows users:
You need a DVD Ripper.


Step 1: Load your DVD to it
Step 2: Choose output profile
Step 3: Start Conversion


For Mac users:
Step 1: Download DVD Ripper for Mac.


Step 2: Load you DVD
Step 3: Choose output profile
Step 4: Start Conversion


Part 2: How to Copy DVD video/movie to another DVD Disc
To Copy a DVD to a blank DVD Disc you need a DVD copy Software and a DVD +/- RW Drive and a blank DVD Disc.


Step 1. Choose Source:
The source of this DVD Copy software can be: DVD disc, ISO image file and DVD folder
Step 2. Preparation
Before you click the “Start” button,
1. You can choose to copy the full disc or the main movie.
2. You can choose the audio, subtitle of the copy.
3. You can change the name of the volume.
4. You can choose to “include menu” or “skip menu” or neither of them.
Step 3. Choose Target:
You can copy your source to 3 target: DVD disc, ISO image and DVD folder
Step 4: Start Copy

Part 3: How to Convert Video
Here you need a Video Converter to help you.


Step 1: Add Video
Step 2: Choose output profile
Step 3: Start Conversion

2011年6月14日星期二

How to Rip DVD to iPad 2?

Enjoying DVD movie on iPad 2 would be a tough task as the iPad 2 cannot play DVD. However, with Aiseesoft DVD to iPad 2 Converter, users can conveniently enjoy any DVD movie on your iPad 2. This DVD to iPad 2 Converter is professional DVD to iPad 2 Ripper to rip any DVD to iPad 2 video and audio formats with perfect output quality and amazing converting speed.

First, you need to download the installation package of DVD to iPad 2 Converter and install it. Then you can see the interface as below.


Step 1: Load DVD

You can input any DVD disc, DVD folder, or DVD IFO file to this DVD to iPad 2 Converter.

Step 2: Edit video effect

If you are not satisfied with the original DVD movie effect, you can customize it with the built-in video editing features. It enables users to trim video length, crop video playing area, adjust video aspect ratio, modify video brightness, saturation and contrast, etc. You can click the relevant button to do all these editing.

Step 3: Choose audio track and subtitle

Usually, the DVD movie has more than one audio track and subtitle. You can choose your preferred one with this DVD to iPad 2 Converter.

Step 4: Adjust output settings

With this DVD to iPad 2 Ripper, you can adjust Video Encoder, Frame Rate, Video Bitrate, Resolution, Audio Encoder, Sample Rate, Channels, and Audio Bitrate. Also you can input your own solution.

Step 5: Choose output profile

Aiseesoft DVD to iPad 2 Converter can rip DVD to abundant of output formats. You need to choose one from the profile drop-down list according to your need. Then you can press the "Convert" button to start ripping DVD to iPad 2.

2011年6月12日星期日

How to Rip DVD, Convert video and Backup your video/audio files on ipod on Mac

Until three months ago, I’ve been being a windows user, and I’m quite good at how to enjoy dvd/ various video on my windows. While, I received a birthday present—an Apple Macbook, from my parent, and at the beginning, it’s really suffering to get used. I don’t know how to enjoy DVD, Video, even can’t backup my ipod’s stuff.
Fortunately, few days ago, I found some useful tools to solve all my problems.
Here, I want to share these experience with more friends.

First, I want to tell this article including three parts:
Part One: How to rip DVD to various video formats on Mac?
Part Two: How to convert video to what you wanted on Mac?
Part Three: How to backup your ipod stuff on Mac?


Ok, let me explain one by one.

Part One: How to rip DVD to various video formats on Mac?
Now, I’m using Aiseesoft DVD Ripper for Macto do that.
It provides a best and easy to rip dvd to various video formats, so you can enjoy dvd on your portable devices, such as: iPod, iPhone, PSP, Zune. etc
It’s easy to use, just few click:
Step 0: Download and install the dvd ripper for mac, and you will see the interface as follows:


Step 1: Place the DVD into your DVD drive and click the “Load DVD” button to load DVD.
Step 2: Select video formats from "Profile" drop-download list
Step 3: Set the special settings such as "trim","effect",etc to cater to your need and click "Start" to start your conversion.

Part Two: How to convert video to what you wanted on Mac?
You just need AiseesoftVideo Converter for Macto help you.
And I don’t want to talk more, you just can have a try by yourself

Here is how to use it:
Step 0: Download and install this video converter for mac. And you can see the following interface


Step 1: Click the "Add File" button to load your video
Step 2: Select the output profile and output Video settions.
You can cut a clip of your video by using its "Trim" function
You can merge a few videos into one file by clicking "merge into one file"
You can crop the black edge of your video to adjust your video to your iPod screen to get the best view.

Then click the "Convert" button to sart the conversion.


Part Three: How to backup your ipod stuff on Mac?
Easy to solve this problem too.
AiseesoftiPod to Mac Transfercan copy your selected video, audio and image files to your Mac immediately without any loss
Ok, just few clicks, you will finish the work.
Step 0: You need download Aiseeosft iPod to Computer Transfer


Step 1: Plug your iPod to your Mac, and pick up what you want to backup
Step 2: Click “iPod to Mac” and find where to put your iPod info on your Mac and click “Open”
Few seconds later, your iPod songs will be on your Mac.

2011年6月9日星期四

How to Copy DVD, Rip DVD, Convert Video on Mac

Many friends want to share their home-make DVDs and their DVD movies with others and also they always feel difficult to do that. Today I will share you a really easy way to Copy DVD to another DVD disc, DVD image ISO, or a DVD folder. Also I will also introduce you how to rip DVD and convert videos on Mac.

Part 1: How to copy a DVD to another DVD disc/DVD image ISO/DVD folder on Mac
Step 1: DVD Copy for Mac.
To copy a DVD on Mac, you need a DVD Copy for Mac to help you. Aiseesoft DVD Copy for Mac is a good choice.


Step 2: Load Your Source
This excellent DVD copy for Mac allows you to load DVD folder and DVD image ISO.

Step 3: Choose Output Info
1. “Full Disc” or “Main Movie”
This DVD copy for Mac enables you to copy the full disc and also the main movie according to your need.

2. “Audio”, “Subtitle” and “Volume” name
You can choose your output audio from the “Audio” drop-down list, such as “all audio”/ “None”/ or some audio the DVD provide.

Subtitle is always an important thing, you can choose your output subtitle in “Subtitle” drop-down list.

You can also name your output volume's name

Step 4: Choose Your Target
You can copy your DVD to another DVD disc, DVD folder or DVD image ISO.

Tips:
1. You can also choose to copy the menus or not.
2. All the info you choose will be dispalyed on the “Info Box”.

Part 2: How to rip DVD to video formats on Mac

Step 1: Download Aiseesoft DVD Ripper for Mac

Step 2. Load DVD
Insert DVD into your DVD-ROM, run DVD Ripper for Mac, click “Load DVD”, find the DVD folder of the movie you want to add from your DVD-ROM, and Click “Open”.


Step 3. Set output format.
This best DVD ripper for Mac provides you output formats as many as you want. Just choose one from the drop down list “profile” according to your portable player.

Step 4: Conversion
You can just Click “Start” to begin your conversion.

Part 3: How to Convert Video files on Mac

Step 1: Download Aiseesoft Video Converter for Mac


Step 2: Load video
Easily click “Add File” to load your video that you want to convert.

Step 3: Choose output profile and settings
At the bottom of the interface there are a drop-download list named “profile”. You can choose your output format here.

Tips:
1. Trim
If you want to pick up a part of the video to convert, please click “Trim” button and drag the “Start trim slider” to set the start time and “End trim slider” to set the end time. (a) You can also do that by clicking the “Start trim button” and “End trim button” (b). The third way you do that is set the exact Start/End time at the right of the pop-up window and click “OK”.(c)

2. Crop
If you want to remove the black edges or you want to convert a certain area of your video, please click the “Crop” button. You can do this either by drag the frame around the movie (a) or set the crop value: “Top, Left, Bottom, Right”.(b). Another way to do that is choose models from “Crop Mode”(c).
Aiseesoft Video Converter for Mac also allows you to chose the output aspect ratio above the crop pane, “Keep Original, full screen, 16:9 and 4:3” are available.

3. Effect
If you want to adjust the effect of your movie, please click the “Effect” button and a pop-up effect window will appear. It allows you to edit your movie’s effect including “Brightness, Contrast, Hue, Saturation and Volume”.

2011年6月7日星期二

How to import music from iPod to iPod without iTunes

Ever since iPod was released, millions of people have been crazy about it. There appeared some assistant tools to manage iPod without iTunes:

1.Aiseesoft iPod Manager for Mac is one of the best Mac tools that can transfer Mac to iPod Shuffle, iPod backup for Mac. It is the best for iPod iTunes Mac software.

2.Aiseesoft iPod Transfer is another Windows all-in-one tool including iPod to iPod Transfer, computer to iPod Transfer and iPod to computer transfer.

Part One: How to manage iPod without iTunes on Mac. (Transfer Mac to iPod Shuffle, iPod Backup for Mac)

1.Download and install Aiseesoft iPod Manager for Mac.
For Intel: http://www.aiseesoft.com/downloads/mac/ipod-manager-for-mac.dmg
For Power PC: http://www.aiseesoft.com/downloads/mac/ipod-manager-for-mac.dmg
2.Connect iPod to Mac via USB.

Transfer Mac to iPod Shuffle:


Select “Music”, “Video” or “Picture”. Then click “Mac to iPod” to choose the files you want to transfer to iPod. Click “Open” to finish the transfer.

iPod Backup for Mac:


Select files you want to backup. Click “iPod to Mac” and find the place where you want to transfer your iPod files to your Mac and click “Open”.

Part Two: Computer to iPod Transfer, iPod to iPod Transfer, iPod to Computer Transfer for Windows users

1.Download and install Aiseesoft iPod Transfer.
2.Connect iPod/iPhone to computer.


Computer to iPod Transfer
Click “computer to iPod” button to seek the files or folders that you want to import to iPod and click OK.

iPod to iPod Transfer
Pick the files that you need to transfer. Just click “iPod to iPod” button and it will show you the folder of another iPod that you want to transfer to. Click OK. The transfer can be finished automatically.

iPod to Computer Transfer
Check the file(s) you want to export in the file list. Click “iPod to computer” button to
select the destination of the exporting files and start exporting files.

Hope it helps you!

2011年6月6日星期一

Share: How to Convert DVD to PSP/PS3, convert Videos to PSP/PS3

We all have known that PSP is an excellent game player. However, we can’t play games all the time; We can achieve other aims with it, such as watching movies, appreciating music…because it has such a big screen for video and a clear earphone for music. For the reason above, I will introduce a practical method to rip DVD movies, convert video files to MP4 format for our PSP. At the same time, we can extract audio from DVD/video files to MP3, AAC PSP audio formats for PSP music.
Now I will share with you a practical tool to solve the problem mentioned above: Aiseesoft PSP Movie Creator. It is the combination of Aiseesoft DVD to PSP Converter and Aiseesoft PSP Movie Converter.

PS3 users share the same feast!

This article includes two parts.
Part 1: How to enjoy DVD on PSP/PS3
Part 2: How to convert Videos for PSP/PS3

Part 1: How to convert DVD to PSP/PS3.
Step 0: Download Aiseesoft DVD to PSP Converter and run it.

Step 1: Click “Load DVD” button to load your DVD.


Note: This professional DVD to PSP Converter can load three DVD source, you can load your DVD from DVD drive, DVD folder in your PC and also IFO file.

Step 2: Select the output video format you want from the “Profile” drop-down list.
Step 3: Click “Start” button to start your conversion and in a short while it will be finished.

Some powerful functions such as "Effect", "Trim", "Crop" are all available.

Part 2: How to convert Videos to PSP/PS3.

Step 0: Download Aiseesoft PSP Movie Converter and run it.

Step 1: Click “Add File” button to add your movie.


Step 2: Select the output video format you want from the “Profile” drop-down list.
Step 3: Click “Start” button to start your conversion and in a short while it will be finished.

Some powerful functions such as "Trim", "Crop", "Snapshot”,"Merge" are all available.

Tips:
In the “Setting” list, you can choose different “audio bitrate”, “video bitrate”. The higher bitrate you set, the more high-fidelity video and music you enjoy on your PSP or PS3.

Key Functions-----Apply to Aiseesoft DVD to PSP Converter and Aiseesoft PSP Movie Converter

"Trim" function ------Split the DVD / video to your favorite edition
There are three methods to set trim time:
Method 1: Enter the start time in the Start Time box and click OK, then enter the end time in the Set End Time box and click OK.
Method 2: Drag the scissors bars under the preview window when you want to trim, then the time will be shown in the Start Time box and End Time box for your reference.
Method 3: Click "Trim From" button when you want to begin your trimming. Click "Trim To" button where you want to stop your trimming.

After you set trim time, the length of the captured clip will be shown in the Select Length box for your reference.

“Merge” function----Join the videos into one file.
Select the videos that you want to join, and then pick “Merge into one file”. After conversion, these chapters will be saved into one file.

2011年6月5日星期日

Full Guide: How to Convert DVD to MP4, AVI, 3GP, iPod ......

DVD is the first choice for many people when they want to watch movies at home. It has high quality picture, different subtitles and audio tracks and most important, some of the DVD movies are more enjoyable than than the cinema one.
However, when we travel, when the disc is broken, when we want to backup the DVD movies, when we want to share the movies with friends, when we want to make usage of the movie, what should we do?
Convert DVD to video video formats you need.

This guide aims to show you how to convert DVD to different video format both for windows/mac users.

Part 1: How to Convert DVD on Windows with DVD Ripper


Step 1: Load DVD
Put your DVD to your DVD Drive and click “Load DVD” button to add your DVD
Step 2: Choose Profile
Choose your output video profile from a drop-down list.
Step 3: Start Conversion

Part 2: How to Convert DVD on Mac with DVD Ripper for Mac


Step 1: Load DVD
Click the “Load DVD” button, find the DVD folder of the movie you want to add from your DVD-ROM, and Click “Open”.
Step 2: Choose output profile and settings
Selecting output format is really easy, you can chose your output format according to your devices players and the default setting works great.
For a veteran of digital player, you could customize your own settings by clicking “Settings” button to chose your own video resolution, frame rate, bit rate, encoder, etc.
Step 3: Start Conversion

If you want to convert both DVD and videos, here is a really powerful DVD Converter Suite . It can help you to convert DVD and videos easily. It can also help you to backup the iPod music and videos to your computer.

2011年6月2日星期四

How to Easily Convert and Edit Video/Audio for Nexus One

What is Nexus One?
The Nexus One is a smartphone from Google, released on January 5, 2010. The phone is featured with the ability to transcribe voice to text, noise canceling dual microphones and GPS guided turn-by-turn voice directions to drives.

Besides features above, this version of the Nexus One can also hold video and audio. I feel most of users want to add moive video and music. But the not supported format is the problem. So Nexus One Converter was released closely following the Nexus One. It can easily convert popular video format, such as HD videos, SWF, FLV, VOB, MOD, MP4, H.264, M4V, AVI, WMV, 3GP, 3GPP, MOV, DivX, XviD, QuickTime Video, DV, MJPG, MJPEG, MPV, MPEG, MPEG2, MPG, etc. to formats (MP4, 3GP, AVC, AVI, MPEG-4, etc.) supported by Nexus One.

Next this article shows you how to use Aiseesoft Nexus One Video Converter.

Tips: How to effect, trim and crop the video to improve your output video quality.
After your Load your video you can click “Effect” button to access the editing panel.

1: Effect
Adjust the video effect as you want: Brightness, Contrast, Saturation and Deinterlacing.
2: Trim
Clip your video, pick up any part of your video to convert.
3: Crop
Adjust video size, Cut off the black edge of your video to let you enjoy your movie in full screen by click the 'Crop' button.
You can also select the aspect ratio from the Zoom Mode drop-down list. There are 4 choices for you: Full Screen, 16:9, 4:3 and Keep Original.

If you want a try, download and install Aiseesoft Nexus One Video Converter.

After you convert your videos you can put the video to your Nexus One.

2011年6月1日星期三

A wonderful app to help you enjoy your DVD on Mac at will

At the moment, after the hot wonderful movies having been played, we feel we have not given full expression to the views. So we collect various wonderful movies recorded in DVD format, which has better effect.
In fact, DVD brings us great success in the wonderful movies, but also it causes the inconvenience when you backup user’s data, storage and transmission online, etc.

Let’s just imagine, a random DVD movie will be several G, it will be very hard to be stored, backed up, not to mention the transmission on line.
And also as the portable devices appear, like iPad, iPod Touch 4, iPhone 4, Zune, Zune 2, Blackberry, Nokia, Creative Zen, Sony Walkman, Archos, PS3, Apple TV, Xbox, Pocket PC, Mobile Phone, etc. It will not be so convenient to watch those wonderful DVD movies anywhere with you.

Luckily, Aiseesoft DVD Ripper for Mac, certainly you can have a try the Windows Version DVD Ripper.


Thus we can reduce its volume at the price of loss picture and audio/video quality, usually down to hundreds MB, or even lower. That depends on the converted format.
The more significance is that it can convert DVD to some special formats or save it on special place, for example AVI, 3GP,MP4, FLV, etc on the iPhone, PSP or upload to Youtube.
This best and easy to use DVD Ripper for Mac provides you with fastest speed to rip DVD to AVI, MP4, MOV, FLV, WMV, DivX, XviD, HD MP4, TS… video formats, and MP3, AAC, AC3… audio formats on Mac. So we can enjoy them on iPod touch, iPod nano, iPod classic, iPhone, Apple TV, PSP, Zune, Creative Zen Vision, Archos, iRiver, HP iPAQ, General Pocket PC, Black Berry, Xbox360, PS3, YouTube, Mobile Phone everywhere with yourself.

This software also provides you the Powerful editing functions like: Trim DVD, Crop the video, and Merge files into one and Multiple features like: Preview and snapshot, Adjust output effect, Output multiple formats for one video at the same time.


Now, don’t hesitate, just have a free try first by yourself.
Hope this app can be helpful for you.